Instead of embarking on a never-ending hunt for a summer beer that has all of your favorite flavors and notes, why not just make your own by having your best home brewing kit?
This “cool factor” is enough to entice many people to pursue brewing as a hobby. But if you’re still on the fence, have any reservations or worries, or believe it’s something you can’t do, let me alleviate your fears.
Why indulge in homebrewing?
Having the best home brewing kit is not as expensive as you think
Many individuals appear to believe that starting homebrewing necessitates the purchase of a slew of expensive equipment. It couldn’t be more untrue! To brew your first batch of beer, you can get a starter kit that includes everything you need for roughly $75. It is a terrific opportunity to dip your toes into the pastime and see whether it’s something you’d like to proceed with. So for your convenience, here’s the best home brewing kit for beginners by our experts specifically with simple methods. Don’t forget to check out!
While there are varieties of brewers to make the best home brewing simple, but a kit with minimal equipment is all you need for your first set of down and dirty batches of beer. However, when it comes time to bottle or keg your new product, a few extras can obtain all the essentials you need for around $100.
Participate In an Age-Old Tradition
While brewing beer has a long history dating back to the Neolithic period, you still have the opportunity to participate in a 9,000- year-old ritual. After all majority of this history takes place on a modest scale. Brewing was an integral element of daily life in the family and community long before it became a commercial enterprise, provided that beer production was a vital component of daily nourishment.
Ultimately, you have the unique option to carry on these traditions by brewing on a smaller, more personal scale at home.
It Makes a magnificent gift.
Nothing can compare to a good homemade present. It conveys thoughtfulness, compassion, and love in a manner that no store-bought present can. Homemade beer is a fantastic gift for any occasion, and believe me when I say that people will be impressed. Check out for more variety in the home brewing kits.
Anyone Can Make Good Beer
Anyone can create a beer even a college student, that is as good as the ones in your neighborhood bottle shop. It’s not rocket science; it’s brew science, and you don’t even need to know how to do the science part. On the other hand, you can make it as simple or as complicated as you wish. If you can follow directions, clean properly, and treat your yeast well, your beer will emerge just great.
Now that u know how easy it is, we have collated a list of the best brewing kits, especially for college students.
To your health
While there is no denying that drinking too much beer isn’t good for you, on the other hand, it is proven that beer in moderation has health benefits. Moreover, beer is high in antioxidants, vitamin B, fiber, protein, and silicon and is one of the best sources of these nutrients. These nutrients derive from the beer’s ingredients. Hence, the malt, yeast, hops, and other ingredients all contribute to the ultimate nutrient composition of the beer, but it doesn’t stop there.
Brewing practices also play a crucial role, particularly filtering. Almost all commercial craft brewers filter their beer unless they’re making a style that requires some haze. The first thing to remember is the finer is a beer filtered lesser of these nutrients result in a finished beer. You have more control when you brew at home. In other words, you will have a healthier beer if you avoid filtering it. However, you can take it a step further here.
While, many herbs and other components (raw honey, for example) were utilized by ancient brewers, resulting in a good drink that was more akin to a health tonic than a mere libation. Only a few of these plants have made it into commercial breweries. Similarly, different options for adventurous homebrewers are Chamomile, Dandelion, Heather, Nettles, Sage, Yarrow, Kombucha, and some other plants with health benefits.
Also, check this link for more info on Kombucha.
Pride
There is something magical about making terrific home brew for yourself. Similarly, painters, carpenters, cooks, writers, bakers, jewelers, and so on all take deep-rooted pleasure in the craft of creating something of themselves into the world.
Therefore, it’s liberating to understand what makes outstanding beer and to be able to recreate the process. After a long day at work, you can come home, grab a beer and enjoy something you’ve made using a beer brewing kit. Instead of going to a pub and tasting discerning beer, stay at home and enjoy brewing exactly replication or making a slight change. It’s liberating to brew your beer. Above all, you are no longer limited to what’s on the cart or in the brewpub.
Tips for maintaining your best home brewing kit
If you are concerned about ensuring that your best homebrewing tools work as smoothly as possible, you need to sustain it properly. You must maintain your brewing equipment in the same way that you maintain your HVAC, electrical, and plumbing systems. Otherwise, it may produce poor-quality homebrew beverages, or you may have to replace them.
Cleaning and sanitizing your equipment are the first step in making high-quality homebrews. While this may appear to be a lot of work, there are a few steps you can do to ensure that your equipment performs as efficiently as possible.
Use the Correct Cleaning Supplies
When cleaning your homebrew equipment, make sure you use the correct cleaning chemicals. Advanced cleaning products have been developed to assist you in sanitizing your equipment and are the most effective way to care for your supplies.
If you want to utilize regular household cleaning products, you need to check them out carefully. Some cleaning agents are suitable for use with homebrew equipment, while others are not. For example, if you use scented cleaning products, the smell will affect the flavor of your wine or beer.
Avoid abrasive scrubbers and brushes.
You probably use gear scrubbers to clean your pots and pans since they can get rid of almost anything. You might think that you can clean your brewing kit too, but it is not the case. Instead, you are required to use non-abrasive scrubbers and brushes. If the cleaner is abrasive, it will develop scratches in your homebrew. Moreover, these crevices are perfect places for viruses, bacteria, and wild yeast to hide. Because this makes it simpler for your homebrew to become polluted, therefore you should use non-abrasive scrubbers to avoid this problem.
Clean the Spigot regularly
Remove the spigot before and after using it. A typical source of contamination is the spigot. Sure, removing and cleaning it takes effort, but the implications of neglecting this step might be significant. Most importantly, if you keep the spigot attached and use it for numerous bottling cycles, crud will start building up from the inside. In addition, the fluids will have a hard time passing through, and they might also coat from the inside. Therefore, it’s more difficult to remove when the coat is from the inside. Instead, remove the spigot and clean it thoroughly after each usage.
Follow the Guidance Provided by the Manufacturer
If you buy homebrew for wine or beer, it should include instructions from the manufacturer. Follow as it says. For instance, if you have a kegerator, then flush it with cleaner frequently. Moreover, clean the inside of the kegerator, lines, and couplers regularly.
The period between cleanings will vary depending on the manufacturer, but you should flush the lines every few weeks. If you’re running a business, you should do it every two weeks. If you’re using it at home, you can go up to four weeks between visits.
Did You Know?
Experts believe that people mastered the art of brewing beer and wine about 12,000 years ago. Around 6,000 years ago, there was substantial evidence of the craft in ancient Egypt and Mesopotamia, now modern-day Iraq.
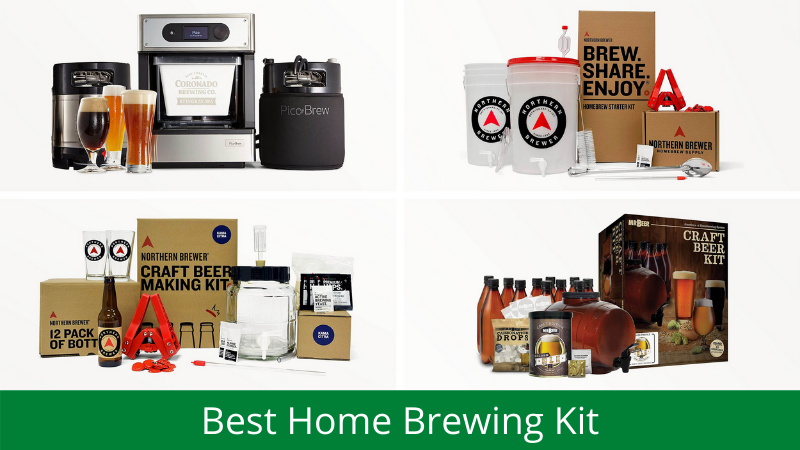
Best Home Brewing Kits – a summary list
#1. Grainfather All in One Home Brewing System – Intelligence combines with excellence to get you an uncompromised quality with this Grainfather brewing kit.
#2. BeerDroid Fully Automated Brewing System – When it comes to quality and elegance, this product is unparalleled. This top model too stays true to its brand image!
#3. PicoBrew Pico C Beer Brewing Appliance – Backed with great user reviews, you don’t need any further assurance for the quality and utility of this product! It’s a sure buy!
#4. Northern Brewer Delux Homebrew Starter Kit – A versatile equipment that can brighten up your brewing experience. You will not regret this purchase!
#5. Brooklyn Bew Everyday IPA Making Kit, Brooklyn Brew Shop – Simple and affordable, yet this brewing kit can do your job well. My full recommendations for a buy this Brooklyn brew shop especially if you are looking for budget-friendly.
Features and reviews of the Best Home Brewing Kit Listing
#1. Grainfather All in One Brew, Home Brewing, Complete beer making kit
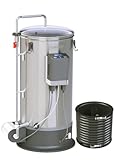
- SIMPLE AND USER FRIENDLY: The Grainfather is electrically powered and designed to be used indoors; No need for burners or hot plates; just plug in and go;...
- HIGHEST QUALITY CONSTRUCTION: The Grainfather is made from high quality 304 grade stainless steel with a 8 gallon capacity; designed to produce up to 6 gallons...
- INTUITIVE DESIGN: Programmable step mashing; delayed heating; waterproof digital display in Celsius and Fahrenheit
- INNOVATIVE FEATURES: Use the Connect Control Box in conjunction with the Connect App and Grainfather Brewing Community for the ultimate brewing experience;...
- FANTASTIC SUPPORT: The Grainfather is fully supported around the world by a fantastic support team who love brewing just as much as you do; Our support team is...
All-in-one homebrew means that all of the major stages of brewing, such as mashing, sparging, bottling, and boiling the wort, do not require separate equipment. Instead, when you’re setting it up and using it, it’s easy to imagine yourself at a brewery. You will also save a lot of time by using this best home brewing kit and producing the best wine.
This northern brewer kit is also relatively small, which saves you space compared to having separate equipment for each step of the brewing process. Even for those who are not digitally savvy, the control box is simple to operate. The view display is similarly basic, displaying only the most essential information like the target temperature, current temperature, brew session, and heating element power. The brewdemon controller is Bluetooth enabled and pairs with iOS and Android, so it’s effectively the same brewing system. It’s as simple as pressing a button to pair your gadgets.
The Grainfather App has everything you need to know about the best home brewing kit, including mashing procedures, mash duration, target temperatures, hop timetable, boil length, and more. This home brewing has several pros but only one con i.e. it is expensive.
User Experience
Users love the ideal combination of automation in this Northern brewer brew. Ensuring that users are not overwhelmed by the process while also feeling like you have sufficiently participated in it. See, I also didn’t find any complaints worth mentioning.
Pros
- Brews 8 gallons
- Bluetooth connected
- Intuitive Design
- Simple and User Friendly
- Highest Quality Construction
- Innovative Features
- Great Customer Service
Cons
- Expensive
My Verdict: The product is an excellent all-in-one brewing system to have at home because it is easy to clean. In other words, it has undoubtedly earned its hefty price tag collectively.
While we are discussing home use kits, we also know that one of the basic tools used every day is a knife that becomes blunt very quickly. Hence, to help you solve this problem, our experts have collated a list of the best knife sharpeners. Now you can sharpen your knives sitting in the comfort of your home without the need for frequent replacement. So, do refer to our post and choose the best!
#2. BeerDroid Fully Automated Brewers HomeBrew Kits, Brew Share Enjoy at Home

- The BeerDroid is the world’s first fully automated personal brewer. You can brew 2.6 gallons of premium quality beer with the push of a button.
- Included with your BeerDroid is the American Pale Ale BrewPrint. BrewPrints have been designed by BrewArt master brewers and are inspired by the world’s most...
- The BeerDroid is Wi-Fi connected and with the BrewArt app you can monitor and control your brew, receive push notifications of brewing milestones, update your...
- Features an easy to read LCD screen to check the status of your brew, control your temperature and customize your brew. Two piece snap tap and easy flush drain...
- The BeerDroid features patented end-of-fermentation (EOF) technology that will automatically detect when your brew is complete and ready for kegging.
It’s a completely automated homebrew. This top-class kit incorporates Wi-Fi, temperature control, and pre-programmed brewing schedules. The system can also identify when a batch is ready to be kegged.
With this best home brewing kit, you won’t have to worry about over fermenting or under fermenting your beer! With a single touch of a button, it can produce around 2.6 liters of high-quality beer. You may even make your beer with its all-natural, preservative-free components. This cutting-edge technology will be the hero of your brewing endeavors.
The BrewArt app allows you to keep track of and control the brewing process. In addition, you may also use the app to receive push notifications about this best home brewing kit milestones, update your firmware, and browse the many beginning recipes and accessories available. Moreover, pre-programmed guidelines, produced by experienced brewers, are known as “BrewPrints,” are included in this kit. Also, the North West Pale Ale BrewPrint is included. All of the ingredients are completely natural, with no additions or preservatives.
Users Experience
Most of the users were happy by exploring their creativity, and it does not pressure you into giving the brewing procedure too much of your time. Many users were impressed by the attractive features and advanced technology. On the downside, there were some complaints regarding the flavor of the beer.
Pros
- Wi-Fi connected
- EOF technology
- LCD screen to check the status
- Uses all-natural ingredients in homebrew
- Brews 2.6 gallons
- Includes the American Pale Ale Brewprint
- Push-button brewing with automated temperature control
Cons
- Expensive
- Complaints regarding flavor
My Verdict: Dazzle by the rare combination of looks and utility is hard to find. So, don’t be guided just by the cost because you get what you pay for!
#3. PicoBrew Pico C Beer Brewing Appliance for Home

- Brews 5 liters of your favorite craft beer at a time - the equivalent of (13) 12-ounce bottles - using pico Pak, kits containing all-natural grains and hops...
- Select pico Pak from award-winning beers from a growing list of over 180 large and small breweries around the world available on the pico brew...
- Fine-tune the ABV (alcohol Content) and ibu (bitterness level) of any pico Pak to your liking, or create a custom freestyle pico Pak with your own recipe of...
- Simple cleanup with built-in steam cleaning and dishwasher-safe components
- Pico Pak sold separately
A fully automated craft brewery that manufactures fresh craft beer using top award-winning breweries’ recipes. In addition, with the push of a button, you can brew whatever style of beer you desire, from IPAs to session ales to stouts and porters. Moreover, it uses PicoPak ingredient bundles, ready to brew and remove the guesswork out of homebrewing.
Once inserted, RFID technology recognizes the biodegradable PicoPak and optimizes the recipe settings. Any Web-enabled device may keep track of the automated best home brewing kit process. Nearly two hundred prominent breweries have developed hundreds of craft beer recipes that can be brewed on the new Pico Model C.
User Experience
Beginners have appreciated the beer simply beer that it creates. You can watch TV or do your daily chores while it forms the flavor of the beer. You might plan ahead of time, but that isn’t a major problem by looking at its features.
Pros
- Brews 5 liters
- Excellent for bottling beer
- It uses ready-to-brew PicoPak ingredient packs
- Monitor the automated brewing process with any Web-enabled device.
- Simple cleanup with built-in steam cleaning and dishwasher-safe components
- RFID technology recognizes the biodegradable PicoPak and optimizes the settings for that recipe once inserted.
Cons
- Expensive
My Verdict: In my opinion, it is the coolest product with easy-to-use functions that creates great beer. A full thumbs up from its users.
#4. Northern Brewer Buy Delux Homebrew Starter Kit, Brew Beer
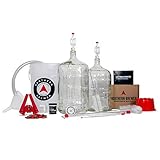
- PROVEN: The Deluxe Brewery in a Box is our best-selling beer brewing starter kit in history! Tested by our employees and trusted by our customers for over 20...
- CURATED ingredients for 5 gallons of homemade beer that tastes like it was made by professionals. Recipe: Fresh Squished IPA. Yield: 50 twelve ounce bottles.
- FRESH SQUISHED IPA: Grapefruit, melon, berries, lime, passion fruit. Dripping with vivid flavors, Fresh Squished is the hoppy equivalent of visiting your local...
- FEATURING: 2 premium large glass bottles (carboys) for two-stage fermentation. Foolproof instructions. Your first homebrew is a guaranteed success.
- CONTAINS: Fresh Squished IPA Recipe Kit, 6 Gallon Glass Carboy (Primary Fermentor), Bung & Airlock, 5 Gallon Glass Carboy (Secondary Fermentor), Bung & Airlock,...
Since 1993, Northern Brewer has been a leader in the home brewing supplies sector. Brewers built this Starter Kit for brewers. The Brewery in a Box is the most advanced beginning kit available. Furthermore, it’s big enough to hold all of the Deluxe Starter Kit’s recipe kits, plus it’ll double as a mash tun when you’re ready to move on to all-grain beer recipes.
It is the best home brewing kit to get if you want to make beer that tastes as it came straight from a premium brewery’s tap right away. It includes in your hand-picked beer recipe kit: Premium grains and malt, flavorful & aromatic hops, and expert-selected yeast. In addition, to learn craft beer are included in this beginner kit: Print instructions with visuals, digital manuals, and online videos.
User Experience
As expected, feedback forums are all swamped with positive reviews for this tool. In fact, the average rating by global amazon customers is 4.8 out of 5. This is impressive, considering a high number of users (309) who have rated it. Undeniably, this product seems to have quite a fan-following!
Pros
- Brews 5 gallons
- Recipe: Fresh Squished IPA
- Yield: 50 twelve-ounce bottles
- Easy to use
- Flavorful & aromatic hops
- Make professional-grade beer
- Pocket-friendly
Cons
- Didn’t find any complaint worth mentioning
My Verdict: A great buy for the price and quality. Excellent user reviews are a mark of confidence for this product. Hence, my full recommendation for a buy!
#5. Brooklyn Bew best Everyday Kit, Brooklyn brew shop, Beer Home brewing
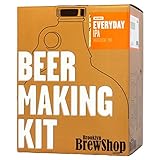
- The Everyday IPA Beer Making Kit is perfect for beginners. Brooklyn Brew Shop makes brewing beer at home simple, fun, and tasty with easy-to-follow videos and...
- Created by published beer authors, our award-winning, all-grain kits are made in America and designed to be brewed on the stove top of any kitchen big or small.
- The kit includes: our Everyday IPA making mix (grain, hops and yeast), 1 gallon reusable glass fermenter, glass spirit-filled thermometer, vinyl tubing, racking...
- We're well-trusted! We've been featured in numerous magazines including The New York Times, Nylon, Food & Wine, Glamour, Thrillist, Travel & Leisure, Vogue,...
- Makes 1 gallon of 6.8% Alcohol-by-Volume beer (9-10 12-oz bottles). Our best-selling beer harmonizes fragrant grapefruit with bright bitterness, making this...
The Beer Making Kit has a six-step method. It’s quite versatile, allowing you to make a wide range of beer styles. This best home brewing kit assists you in brewing and bottling a tasty batch of all-grain beer for a true beer experience.
Each kit includes a beer mix, a 1-gallon reusable glass fermenter, a spirit-filled thermometer, vinyl tubing, and more. You may even pick your beer flavors, with the most popular being the Everyday IPA, followed by the Afternoon Wheat and the Bruxelles Blonde. Produce things simple on the stovetop, and invite a few friends over to help you make excellent all-grain beer.
User Experience
Customer reviews are overwhelmingly positive, with many praising the simple video instructions. Users appreciated the elegant glass equipment in this package, which includes a fermenter that can be utilized for future beer experiments once you get started. On the downside, some customers were unhappy regarding glass bottles.
Pros
- Brews 5 gallons
- Easy to use
- High-quality seasonal ingredients
- Award-winning all-grain kit
- IPA ingredients
- Glass fermenter
- Chamber airlock
- Thermometer
- Classy for bar or as gifts
Cons
- Doesn’t include a kettle, strainer, and funnel
- Complaints regarding the glass bottle
My Verdict: From my standpoint, it’s a great option for anyone who is new to brewing beer and is on a tight budget. This brewing kit is a good alternative for small, occasional batches and also a pretty good choice for a gift.
However, if you are looking for some more options for IPA, then choose from our list of IPA Brewing Kit.
My selection criteria for the best home brewing kit
While making your beer may appear intimidating at first, most home brewing kits make it easier than you think to get started and simplify the process with online lessons and instructions. When looking for the best home brewing kit, consider the equipment included, the amount of beer the recipe makes, and, of course, your preferred beer varietal.
Clear Instruction
If you’re just starting as a brewer, adhere to simple recipes and clear instructions that explain everything to you. All of the home brewing kits on this list come with step-by-step instructions to guide you through the brewing process.
Equipment Included
Not all kits include the equipment you’ll need to get started. Check whether the recipe calls for any additional pots, strainers, funnels, or bottles, although the basic kits in this guide include the majority of what you’ll need.
Quantities
Many novice kits come with enough materials to make a gallon of beer, but some may make up to five gallons at once. However, make a large batch to get the most bang for your money, or make enough to offer to friends at a future party or keep on hand in your beer fridge. Moreover, don’t worry if your first batch of beer doesn’t measure up to your favorite local brewer. You can always start from scratch and try out new recipes.
Recipes and Varieties
There is a kit for every beer variety that exists, and it teaches you how to make it yourself. Many kits contain several recipe options, like ales, IPAs, and more.
The Ultimate Step-by-Step Guide to Brewing Beer
Brewing beer is both science and art.
Although there is a correct and calculated facet to the procedure, at the same time, rules and any conceivable constraints can be hazy. Therefore, presenting grounds for personal explanation and formation of a distinctive beer. It looks like it could be back-breaking, right? Well, it is not.
Brewing beer comprises a simple procedure that comes from 12,000 years back. You heat water and grain (or extract from grain), boil the mixture with hops, cool the mixture, ferment the mixture with yeast, and finally carbonate. Pretty easy, right?
Now, inside each stage, we’ll go into a little more detail.
Cleaning & Sanitizing
Once you have all of the essential apparatus, the first stage isn’t brewing at all. First, you’ll need to perfectly clean and sanitize your equipment thoroughly. This step is critical but easy. There are no shortcuts to be taken here. Everything that will come into touch with your beer throughout the brewing process should be thoroughly clean with an unscented mild detergent before being sterilized with a sanitation solution. I commend no-rinse varieties because they make the process simple while still being effective.
The brew
The brew is the process that needs your undivided attention for an extended period. It requires a strict timeline by keeping a close eye on the brewing process as it proceeds. This stage consists of several sub-processes, including mashing, lautering, and boiling, all of which are crucial. It is vital to do your absolute best to get everything right throughout to ensure the overall quality of your beer in the last. In other words, these crucial brewing processes will serve as the foundation for your final product. If you jumble something up, it will undoubtedly affect the line.
Be mindful as you learn home brewing, you will make a mistake the first few times. Therefore, do allow yourself to be discouraged or demoralized by this. However, you must recognize that this is all part of the learning process and that everyone makes mistakes. Above all, take notes, learn from your mistakes, and apply what you’ve learned.
Brewing Methods
Brewing can be done in three different ways: extract, partial mash, and all-grain. As the names suggest, the processes differ mainly in how the beer’s foundation is made, among other things.
Extract Brewing
Extract brewing makes use of extracts from the grains, either in dry or liquid form or a combination of both, to make the foundation of the beer, known as wort. It also contains the use of small amounts of grain to add a bottom to the beer. However, it needs less equipment, space, and time, making it ideal for beginners, novice, and intermediate homebrewers. As some brewers learn and develop, they pick the extract brewing methods simply because it is more convenient.
Partial Mash
Partial mash, also known as “mini-mash”, brewing uses malt extract and grain. The amalgamation of both provides a high chance of formation of the flavor, body, appearance, and overall quality of your beer.
It is an excellent next step for people who have brewed successfully using extract-only approaches and have a good understanding of the process but want to go even farther. At the same time, it doesn’t take nearly as much time, equipment, or space as extract-only brewing, making the transition simple.
All-Grain Brewing
Last but not least, there’s all-grain brewing. It is the purest method of making beer, but it necessitates more equipment, room (and, as a result, a higher financial investment), time, and advanced skills in the brewing process. All-grain brewing neglects malt extracts, so sugars are pulled only from the grains, which provides total freedom during your brew formation. As a result, there may be additional potential for errors to occur. All-grain brewing is only for the seasoned homebrewer with a thorough understanding of the process.
Steps in the Brewing Process
Let’s go over the steps now that you’ve learned about the many ways to brew.
The Mash
The first step in brewing is the mash or mashing.
The mash is the process of activating enzymes in the grain to convert starches to sugar, which provides the yeast with the necessary “food.” It will also create the foundation for your beer’s color, body, and overall flavor. The process of mashing is similar to that of steeping tea. You’ll submerge the grain bill in hot water, allowing the heat to gradually break down starches and activate key enzymes within the grain, leading to the conversion of those starches to fermentable sugars. A few essential things to keep in mind for the mind are water quality, stirring, and temperature.
In the meantime, make an appetizing potato snack at home with the potato masher we have compiled for this specific requirement.
Lautering
The next process of lautering is separating the wort from the grain. In addition, the goal is to remove sugars that may have gotten stuck in the grain after the mash. The reason for doing this is to obtain the highest bang for your buck. Furthermore, sugar feeds the yeast, which eventually converts to alcohol and turns beer into beer rather than non-alcoholic sugar water — the more food the yeast has, the more likely it is to ferment successfully.
There are several procedures to complete lautering depending on the type of brewing, but no matter what step we choose, it will include a step called sparging. Sparging entails heating water to a temperature higher than that of the mash in a separate container, then pouring the heated water over the grain to “rinse” it of any leftover sugars. However, it may require additional equipment in more complex brewing, but the essential principle remains the same.
The Boil
The boil at times can be confused with the mash, but they are poles apart processes. The mash, which converts starches to sugars, does so at a lower temperature than boiling water. The boil, on the other hand, is well termed. The temperature is substantially greater (about 212°F depending on height) and occurs over a longer period than the mash. The goal of the boil is to kill any leftover undesired enzymes, eliminate any damaging oxygen, and stabilize the wort by reducing the pH, resulting in the ideal environment for hops to be added.
Hops are an essential ingredient in beer formation and can attain in different ways of desired effects. Regardless of what you’re going for in the end, hops balance the beer by adding bitterness to counteract the grain’s sweetness. In addition, hops can also be added to the boil in small amounts to give flavor and aroma to the brew. Moreover, it can act as a natural preservative, protecting the beer from germs and other illnesses. Above all, the boil should establish a safe environment in which fermentation can occur successfully.
After the Brew
Now that the brewing step is over, it is time to start fermenting the wort. The procedure includes swiftly reducing the temperature of the wort, putting water, noting a gravity reading, including the yeast (known as pitching).
Cool Down
Most importantly, once a boil is over, it is time to cool the wort immediately to avoid infection. The goal is to get the wort to roughly room temperature in less than 20 minutes.
Depending on the size of your batch and the ambient temperature, this could be a simple task or a very challenging one.
Transfer to the Primary Fermenter & Original Gravity Reading
After cooling the wort, shift it to a storage vessel for primary fermentation. This vessel should be big enough to hold the wort, the sterile topping-up water if required. Once you’ve got the right amount of liquid, it is time to take the first gravity reading. The reading will tell you the specific gravity of the wort, which is its density of water.
Finally, measuring the gravity of your wort will help you determine that your fermentation was successful and will also allow you to calculate the alcohol concentration of your beer (also known as alcohol by volume, or “ABV”).
You can note your first gravity reading (known as original gravity, or “OG”) with the help of a hydrometer. To measure specific gravity hydrometer is used. Moreover, to note the reading, first, get back a sample of your wort and then place it in a container.
Activating & Pitching the Yeast
After taking your gravity reading, it’s yeast time. This step is called pitching in the brewing world. You want to make sure your yeast is ready to pitch before you start brewing, so it’s essential to keep an eye on yeast health.
Moreover, allow your yeast to sit at room temperature for about 3 hours before pitching to ensure it is ready. Furthermore, it will result in better fermentation and, as a result, better beer.
When the yeast is ready, add it to the fermentation vessel and aerate the mixture by rapidly stirring with a sterilized spoon or securing the lid and shaking the jar. Aerating the mixture is vital because it reintroduces oxygen into the previously removed wort during the boil. The yeast or fermenter which will eventually complete the fermentation process requires oxygen to flourish. Secure an airtight cover on the vessel and a sanitized airlock or similar blow-off valve that will allow CO2 gases to exit while preventing outside air from entering when the yeast has joined the party and the mixture has been sufficiently aerated.
Simultaneously, we also have a list of water pitchers that can be used for removing salt. So go ahead and check it out!
Fermentation
Fermentation, the most critical step in brewing, is where the magic happens. Moreover, it is an essential time when the fermenter or yeast turns the carbohydrates into ethyl alcohol and CO2. While fermentation does not necessitate continuous attention like brewing, it does necessitate constant monitoring throughout the process.
For good fermentation to occur, keep the temperature between 68- and 72-degrees Fahrenheit. You’ll notice a discharge of CO2 gas from the vessel after vigorous fermentation has begun. Furthermore, you will see bubbling within the airlock chamber while employing an airlock. Therefore, it indicates that the sugars are being converted successfully by the yeast. When bubbling becomes less frequent, it’s a sign that the primary fermenter is nearing completion. You’ll want to transfer the beer to a secondary fermenter vessel at this point.
Although the more active stage of fermentation has already occurred during the primary fermenter, there are still some fermentable and active yeast cells left. Moving your beer to a secondary fermenter and allowing it to condition will allow the surviving yeast to convert the more complex sugars. A secondary fermenter will improve the quality of your beer by boosting clarity, smoothing out the flavor profile, and lowering the danger of infection and off-tasting flavors.
Final Gravity Reading & Alcohol Content
It’s time to take the final gravity reading, or “FG,” once your beer has spent enough time in the secondary fermenter. The final gravity will help you to determine how much work your yeast has done during fermentation and, as a result, the alcohol percentage of your beer. Take your FG reading the same way you did your OG reading, making sure to keep the idea of adequate sanitization in mind.
Bottling
When you’re ready to drink your beer, keep it in an airtight container or a bottle to allow it to carbonate and condition.
How to bottle beer
You’ll need to follow these steps if you decide to bottle your beer.
- To begin, thoroughly sterilize all surfaces that will come into contact with the beer.
- Then, in the empty bottling bucket, add the priming sugar. Rack the beer from the secondary fermenter to the bottling bucket, which will also combine the two.
- After that, connect the racking tubing to the spigot on the bottling bucket.
- Connect the bottle filler to the other end of the tubing and start bottling your beer by pushing the bottle filler into a sterilized bottle.
- The beer will quickly fill the bottle, and when it reaches 3/4 of an inch from the top, lift the bottle filler to halt the flow.
- Then, gently place a cap on the top of the bottle and cap it by bending the cap’s edge down around the mouth with the capper.
- Keep repeating all of the steps till your batch is completely bottled.
After bottling the batch, keep all of the bottles in a cold, dark place for at least two weeks. This permits the beer to finish conditioning and for the yeast to ferment the priming sugar, producing CO2 to carbonate the beer. Once the beer has had time to condition and carbonate, chill it, and relish!
FAQs
1. Does brewing your beer save money?
Yes, brewing your beer is less expensive than buying it in a store. Even if a six-pack is under $10, you can buy a lot of grain, malts, and barley for that price. However, homebrewing is a hobby for the vast majority of individuals rather than a way to save money on beer.
2. What is the shelf life of homebrew beer?
On average, homebrewed beer lasts 12 to 18 months. The longer it lasts, the higher the alcohol and hop concentration. However, because most simple homebrews have an ABV of roughly 4% to 5%, they will be at their best for about 6 months, though they will be fine to drink for up to a year.
3. Do beer kits have an expiration date?
Yes, the ingredients in beer kits have an expiration date, and you should pay attention to the dates on the ingredients. Furthermore, once you open the containers or bags, you must use them much sooner than the expiration date because the quality will quickly decline.
4. How long will beer yeast last?
In dry form, yeast can remain for up to two years. Each pack will also provide instructions on how to predict the rate of deterioration. Some dried yeast, for example, may still be usable after two years but only contain 50% of the active culture.
5. Are Northern brewers great for brewing beer?
Absolutely yes! In the Northern Brewer kit, everything is being provided for producing the best beer. Moreover, the kit comprises of 1-gallon air lock jug for fermentation, bottle filler, capper, mini auto-siphon, ounces of cleaner, and what not. No doubt it has everything with surpassing quality.
6. Is it possible to reuse a home brewing kit?
Yes, as long as you clean and disinfect it after each use, you can reuse a home brewing kit. Most kits are designed to be reused multiple times, with only a few items that will need to be replaced over time. You can extend the number of times you can use a kit by paying a little more for one that includes glass materials.
Conclusion
While selecting the best home brewing kit may not require very complex technical knowledge, it is important to understand its various facets which I have covered in this review. This knowledge will go a long way in helping you in making the right purchase. It’s important to remember that homebrewing is all about having fun and trying new things. Likely, your first batch of homebrew won’t be ideal, but you must keep trying as long as you learn from your mistakes and strive to improve.

Isabelle Johnson is a fitness expert and yoga trainer with over 12 years of experience as a dietician. Her knowledge of nutritional facts has made her take to the web with her blog, Sprout and Press.
Isabelle lets her audience understand products used in the kitchen, which can improve your diet, add more convenient ways to juice, create smoothies, and do so much more. Her blog informs readers about the newest kitchenware and the benefits each ingredient brings to the table. In 2016, sproutandpress.com was founded to share her knowledge with the world and inspire a better, healthier tomorrow.